
Critique time
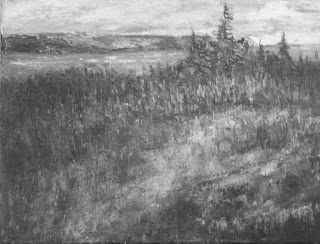
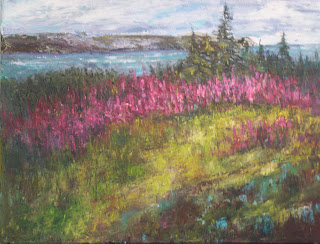
Where do I begin with my discussion about the Summer Fire painting? It seems I've gained a lot of knowledge since 2004! I find it very difficult to talk about shape without including value somewhere in the discussion, therefore I won't try to isolate them. My photo reference for this work is long gone and I can't squint at it or the real scene. I'm left with the image I created.
- My first big mistake was not having the distant island, sky and water as one large shape rather than three smaller shapes. That would mean painting the island in the same value as the sky and water and setting it back in the distance as it was in real life.
- The tree line with its jagged points provides a nice relief from the straight lines of water and island. They also serve to interlock with the shape above it (always a good thing). In terms of value they are possibly too dark because they advance rather than recede. I would lighten them to set them back. In his response to the previous post Don mentioned the tips of the trees on the right being too close to the horizon line (that kissing rule) and that the eye is driven to the tips by the movement of the paint below. It's a very valid point and one I agree with. A bit of change in shape is in order.
- The next large mass (shape) is the line of fireweed and the clump of grass to the left of it. The soft diagonal works well and creates a gentle sway of energy. I would work with the values in this shape and include the grass beneath it using the same value which would be a bit darker than at present. Kathy suggested that I vary the shape of the flowers more as the edges are all "active" and therefore dominant. I agree with this point.
- The lower right shape is much darker in value and works to balance the strong diagonals above it. I had a simple solution for keeping the viewer in the picture plane. - I darkened the left side and the foreground right side. A bit too obvious ! In my own defense I did have three areas of dark to move the eye around.
- I feel there's variety in the shapes : simple and complex, small, medium and large, lights and darks. A big drawback is the lack of passive areas. If the sky, island and water are painted as one shape with lighter values this will become a more passive area and a foil for the more active fireweed.
The response to my last post provided a number of suggestions for checking the shapes and values in a painting. I'd like to include them all in this post so they don't get missed.
Look at a greyscale of the painting
Kathy at Katherine A. Cartwright Studio suggested converting my painting to a greyscale in Photoshop. My proficiency in Photoshop is almost nonexistent, but having a reason is a great motivator. It was as easy as Image, Mode, Greyscale. I was just patting myself on the back about my new found skill when Don sent a comment to explain how to do it. hwfarber also suggested previewing the grayscale picture in print preview using different sizes. If you don't have Photoshop or a similar program, you can scan a coloured photo of your painting as a grayscale and print it.
Reduce an image to black and white
One of the things Ann Buckner does after taking a photo and converting it to b&w is to put the contrast all the way up. This reduces it to black and white and gives a good idea of light/dark ratio, rather like a Notan. She learned this from Rhonda Carpenter.
Look at the work in a darkened room
Kathy also suggested a technique learned from Susan Webb Tregay. Take the painting into a very dimly lit room or closet with the door slightly ajar. That way, there isn't enough light to see the colors, but there is just enough light to see the values.
Look through your camera viewfinder
hwfarber suggested setting your digital camera on black and white and looking at your painting through the viewfinder( a techniques learned from a Caroline Jasper workshop).
Look at your work in a mirror
Don Michael Jr. suggested one way to get a different perspective of your shape structure and the overall quality of your composition is to look at it in a mirror. If you go into the room with the light off, get the painting situated, and then turn on the lights you get an instant "snapshot" in reverse which tells you volumes.
Use a reducing lens
"Another good tool is the reducing lens, which Renaissance artists used and is still sold today" recommended Kathy.
Use a red tinted value finder
I made mine from plain red glass from my husband's stained glass selection. You can also buy ready made ones here. The first time I was introduced to this I thought it was magic. You see everything in shades of red which makes it easier to spot the value relationships and massing of shapes. These work best for work when cool colours are predominant.
4 comments:
Great follow-up. I'm learning with you. In addition to Photoshop and Corel, I often use Picasa--free from Google--really simple buttons for converting to b&w, sepia, adding saturation or tints, etc. and everything can be undone.
This was a great exercise you undertook and shared with us. It was fun and enlightening. Thank you. -Don
hw
You are full of great ideas. I will check Picasa out. I am one of those people who must be driven to any form of technology. When I get there, I usually can't figure out why I was so reluctant to begin the trip. What a lot of knowledge we can bring together when we share. Thanks again for contributing.
Don,
Glad you are "entertained". I learned loads from this exercise. That makes it worthwhile.
Nice follow-up analysis, Margaret!
Post a Comment